Creating Your Ultimate Entertainment Experience
There’s something magical about dimming the lights, settling into a comfortable seat, and being transported to another world through sight and sound. Home theater installations transform ordinary rooms into extraordinary entertainment spaces where movies come alive and gaming becomes an trip.
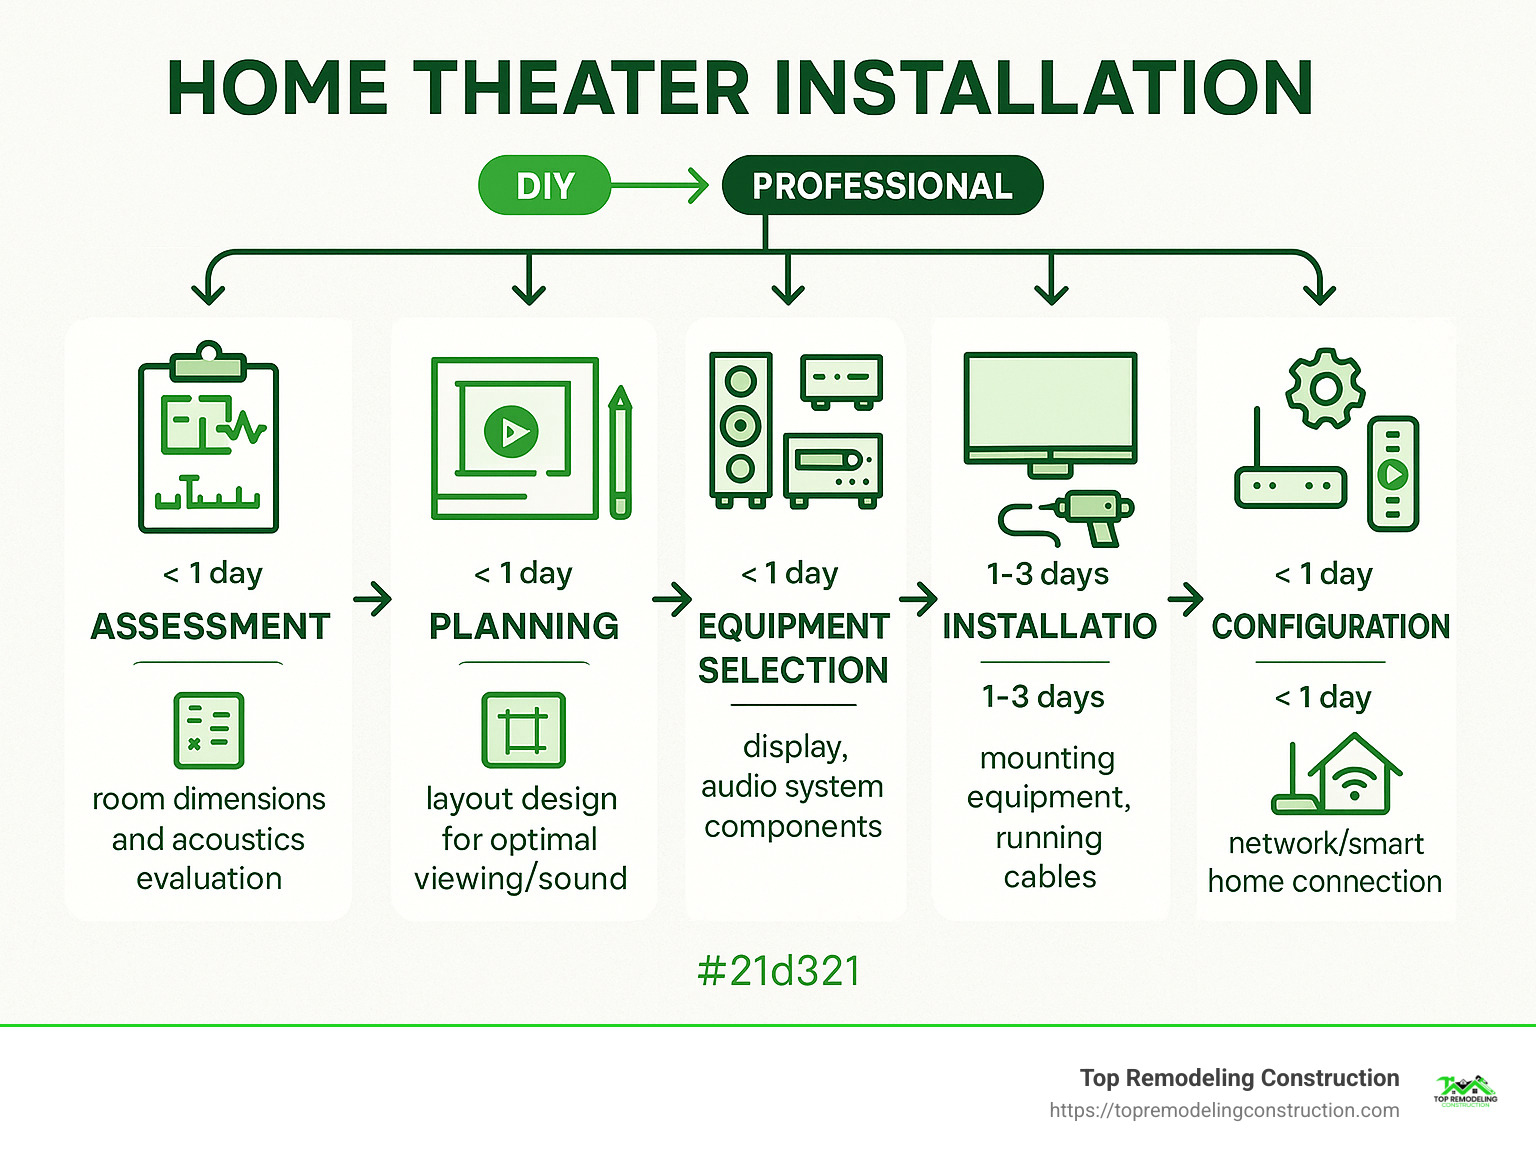
Creating this cinematic magic in your home combines thoughtful design, carefully selected technology, and proper setup. The journey from concept to completion follows a natural progression that ensures every detail contributes to your immersive experience.
First comes the assessment phase, where you’ll evaluate your space. Is the room rectangular? How high are the ceilings? These questions matter because room dimensions significantly impact sound quality. Next, you’ll move into equipment selection, choosing between projector systems that recreate the big-screen experience or premium large-format TVs offering stunning clarity.
“Feel the difference of Dolby Atmos,” notes one industry expert, “it’s the biggest advance in home theater since surround sound.” These modern systems deliver truly three-dimensional audio experiences once exclusive to commercial theaters, with sound that moves around and even above you.
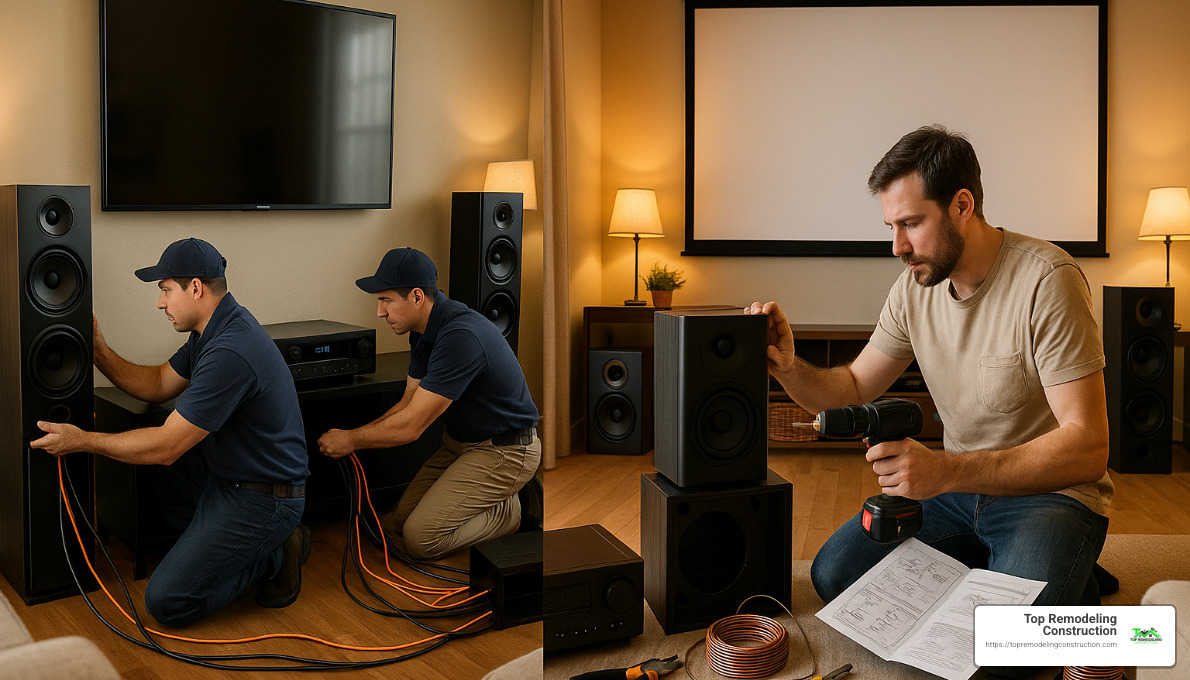
The planning stage is where dreams meet reality. This is when you’ll map out seating positions for optimal viewing angles and design speaker placement that creates your audio “sweet spot.” Proper installation follows, with careful attention to mounting displays securely, positioning speakers correctly, and managing cables for both safety and aesthetics.
Configuration might seem technical, but it’s actually where the magic happens. Calibrating your system ensures colors pop, dialogue is crystal clear, and bass rumbles just right. Finally, integration connects your theater to your home network and smart systems, allowing voice control or automated “movie night” scenes that adjust lighting and temperature with a single command.
Budget considerations span a wide range. A quality basic setup typically runs between $2,000 and $5,000, including a 60-inch TV, bracket, five speakers, subwoofer, amplifier, and necessary wiring. For those seeking premium experiences with advanced components and professional calibration, investments can reach $33,000 or beyond.
The DIY versus professional installation decision ultimately depends on your technical comfort level and desired complexity. While handling it yourself can reduce costs, professional installers bring specialized expertise in room acoustics, equipment selection, and system optimization that dramatically lifts your viewing experience. They see potential problems before they arise and ensure every component works harmoniously together.
Whether you’re converting a spare bedroom into a dedicated theater or enhancing your living room for better movie nights, the right home theater installation creates a space where memories are made. There’s nothing quite like seeing a child’s face light up during their first surround-sound experience or hosting friends for a sporting event where everyone feels like they’re in the stadium.
At Top Remodeling Construction, we understand that your entertainment space should reflect your personality while delivering the performance you expect. The family movie nights, gaming sessions, and binge-watching weekends all become more special in a properly designed theater space.
Explore more about Home theater installations:
– Custom closet installations
– Custom home remodeling services
Understanding Home Theater Installations
The term “home theater” might bring to mind images of luxurious dedicated rooms with stadium seating and popcorn machines, but home theater installations can be custom to fit virtually any space and budget. At heart, a home theater system aims to recreate that magical cinema experience by blending high-quality video with immersive sound in your own personal space.
“One size does not fit all in personal cinema,” as industry professionals often say. This perfectly captures how adaptable modern home theaters can be. Whether you’re changing a corner of your living room or building out a dedicated basement space, there’s a solution that fits your home and lifestyle.
When you hear terms like 5.1, 7.1, or 9.2.6 in relation to home theaters, these numbers aren’t just technical jargon—they’re roadmaps to your sound experience. The first number tells you how many main speakers surround you, the second indicates subwoofers (those bass-thumping speakers that make explosions feel real), and the third number, when present, reveals how many overhead speakers create that three-dimensional sound bubble.
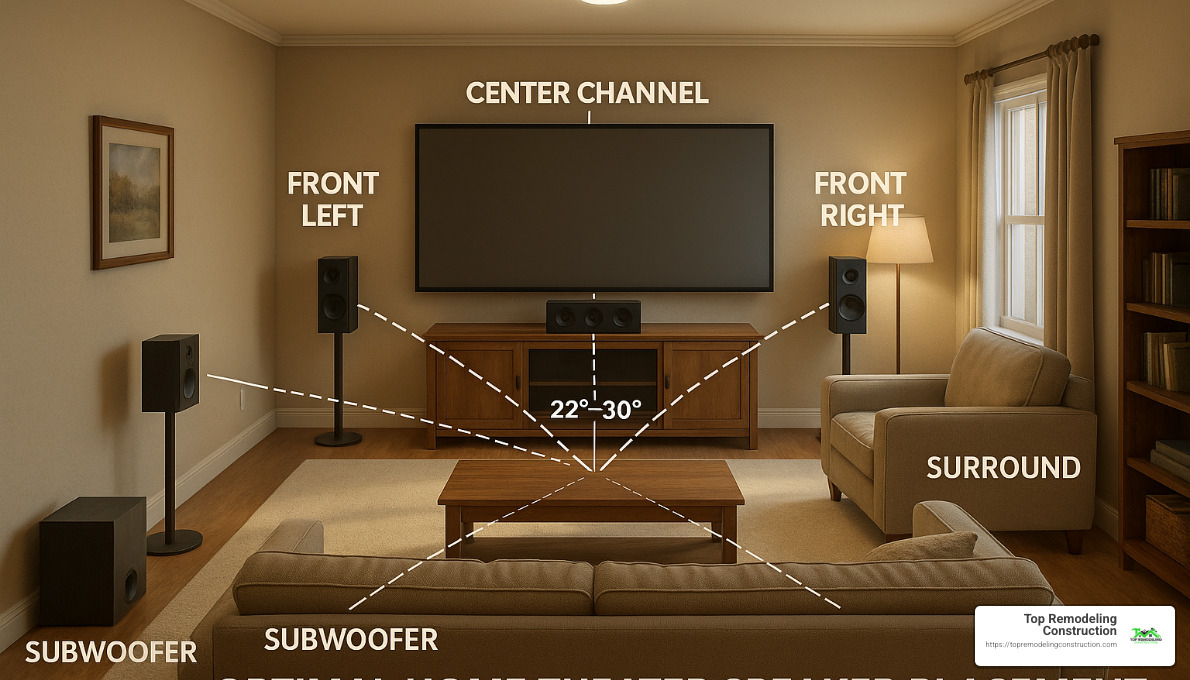
A standard 5.1 system wraps you in sound with five main speakers (front left, center, front right, and two surrounds) plus one subwoofer for those deep bass notes. Step up to a 7.1 system and you’ll add two more speakers behind you for even more immersive sound. The most advanced setups, like 9.2.6 configurations, create a truly cinema-quality soundscape with additional speakers and subwoofers that make you feel like you’re inside the action.
What a Home Theater Installation Typically Includes
A comprehensive home theater installation brings together several key elements that work in harmony:
Your visual centerpiece will be either a large-format TV (typically 65″ or larger) or a projector and screen that transforms your wall into a cinema-sized display. The heart of your audio system includes an AV receiver that processes all those amazing sound formats, along with speakers and subwoofers strategically placed around your room.
Your entertainment sources might include streaming devices, Blu-ray players, or gaming consoles, all controlled through a universal remote or smart home system. Comfortable seating is essential—whether that’s specialized theater recliners or your favorite sectional sofa.
Many installations also include room treatments like acoustic panels to improve sound quality, lighting control for that perfect movie ambiance, and careful cable management to keep everything looking clean and professional.
Industry experts agree that even a basic home theater needs “a wall-mounted TV, sound system, and comfortable seating” at minimum. But most homeowners find themselves naturally expanding beyond these basics as they find how much more immersive their favorite movies and shows can be.
Core Components & Technologies
Today’s home theater installations leverage exciting technologies that were once only available in commercial cinemas:
Dolby Atmos and DTS:X have revolutionized home audio by creating true three-dimensional soundscapes. Unlike traditional surround sound that sends audio to specific channels, these formats treat sounds as “objects” that can move precisely around your room—even overhead. Imagine hearing raindrops falling above you or a helicopter flying from behind you and over your head!
Visual technology has made equally impressive leaps with 4K and 8K Resolution displays offering incredibly detailed images with four to sixteen times the resolution of standard HD. When paired with High Dynamic Range (HDR) technology, you’ll see deeper blacks, brighter highlights, and more vibrant colors that make images pop off the screen.
Acoustic treatments might not be as flashy, but they make a world of difference in how your system sounds. Specialized panels and bass traps control sound reflections and prevent bass buildup in corners, ensuring you hear your audio exactly as filmmakers intended.
Modern systems also seamlessly incorporate streaming integration, bringing services like Netflix, Disney+, and HBO Max alongside traditional media sources, often through smart TVs or dedicated streaming devices like Apple TV or Roku.
How Professional Home Theater Installations Work
When you choose professional home theater installations from Top Remodeling Construction, you’re not just buying equipment—you’re investing in an experience. Our process brings your entertainment dreams to life:
We start with a friendly conversation to understand what you’re hoping to achieve, what kinds of movies or shows you enjoy, and how your space will be used. Our team then visits your home to evaluate the physical space, considering everything from room dimensions and existing architecture to acoustics and electrical infrastructure.
With this information, we create detailed plans showing where everything will go—from equipment placement and seating arrangements to acoustic treatments and wiring routes. Our skilled technicians handle all aspects of installation with meticulous attention to detail, ensuring everything is properly mounted, connected, and configured.
But installation is just the beginning. Using specialized tools and software, we carefully calibrate your system, adjusting audio and video settings to achieve optimal performance in your specific environment. We then provide a comprehensive walkthrough of your new system, making sure you’re comfortable operating everything.
“Professional home theater installation transforms your viewing experience,” as industry experts note. The difference is in the details—proper setup and calibration go far beyond simply connecting components, creating an experience that truly brings movies to life in your home.
And because we stand behind our work, we remain available for questions, troubleshooting, and future upgrades as your needs evolve or new technologies emerge.
Planning the Perfect Room
The foundation of successful home theater installations begins with thoughtful room planning. Whether you’re converting an existing space or building from scratch, several factors significantly impact your theater’s performance.
Impact of Size, Shape & Acoustics
Room dimensions aren’t just about having enough space – they’re the invisible foundation of your sound experience. I love how a well-proportioned rectangular room naturally distributes sound waves more evenly. When clients ask me about the ideal room, I often mention the “golden ratio” of approximately 1:1.6:2.6 for length, width, and height, though I’ve seen stunning theaters in rooms with different proportions.
Your ceiling height matters tremendously, especially if you’re dreaming of that overhead audio experience. While 8 feet is workable, I’ve found that 9-10 feet gives Dolby Atmos and DTS:X installations room to breathe, creating that magical dome of sound that pulls you into the action.
Those beautiful hard surfaces in your home – windows, drywall, hardwood floors – they’re unfortunately sound’s worst enemies. They create reflections that muddy dialog and effects. Don’t worry though! We can tame them with strategic acoustic treatments that preserve your décor while improving sound clarity.
Finding the perfect “sweet spot” for viewing is like finding hidden treasure. Positioning your primary seating about two-thirds back from the screen creates that perfect balance of immersive visuals and balanced audio. As one of our clients recently told us, “I never knew what I was missing until everything was properly positioned!”
Soundproofing Strategies
Nothing breaks the spell of a great movie faster than outside noise – or family members complaining about your rumbling subwoofer! True home theater installations need thoughtful sound containment working in both directions.
The secret language of soundproofing includes STC (Sound Transmission Class) ratings, which measure how well a surface blocks sound. Think of it like this: you’re not building a recording studio, you’re just trying to keep “The Avengers” from waking the baby. The key is consistency – having similar STC ratings across all surfaces prevents sound from finding the weak link.
Double drywall with Green Glue sandwiched between is like a magic sound-absorbing sandwich. This acoustic damping compound converts sound energy to heat, dramatically reducing what passes through walls. I’ve seen this solution transform problematic spaces into peaceful theater rooms.
Insulation choices matter tremendously. While standard fiberglass batts help, rock wool or closed-cell spray foam creates a more complete sound barrier. The spray foam is particularly effective because it adheres to surfaces and seals those tiny gaps where sound loves to escape.
Decoupling is a fascinating technique where we physically separate inner and outer wall surfaces. Using resilient channels, staggered studs, or isolation clips creates a buffer zone that interrupts sound’s path. It’s like creating an air gap that sound struggles to jump across.
Windows and doors are often the acoustic Achilles’ heel in home theater installations. Sound abatement window inserts can capture up to 60% of sound transfer, while solid-core doors with proper seals make a world of difference. One client laughed when I insisted on door sweeps, but later texted me: “I can’t believe how much difference that little strip makes!”
For a complete soundproofing solution custom to your specific space, our team at Top Remodeling Construction can develop a custom approach that balances effectiveness with your budget and needs. Learn more about our Home Remodeling services that include acoustic treatments and soundproofing. For additional guidance, check out this Quick Guide on How to Soundproof a Room with practical tips you can implement.
Lighting & Seating Design
Lighting transforms the theater experience, creating ambiance that improves emotional connection to what’s on screen. The most successful home theater installations feature thoughtfully layered lighting that serves multiple purposes.
I always recommend a three-part lighting approach: ambient lighting for general illumination, task lighting for practical activities like finding dropped popcorn, and accent lighting to highlight architectural features or create drama. Everything should be dimmable – this isn’t just a luxury, it’s essential for creating the perfect viewing environment.
Wall sconces have become the unsung heroes of theater lighting. They provide gentle, indirect illumination that won’t create glare on your screen. As one lighting designer beautifully put it, they’re like “watchful sentinels” around your room, ready to provide just the right amount of light when needed.
For theaters with multiple seating levels, low-profile step lights aren’t just attractive – they’re a safety essential. Nothing ruins movie night faster than a stumble in the dark! These subtle guides prevent accidents without disturbing the viewing experience.
If your theater has windows, blackout treatments aren’t optional – they’re mandatory for daytime viewing. “The difference proper light control makes is night and day – literally,” jokes one of our clients who initially resisted full blackout shades but now considers them essential.
Seating deserves just as much attention as your audio-visual equipment. The distance between your seats and screen should generally follow the 1 to 1.5 times rule – sit at a distance equal to 1-1.5 times your screen’s diagonal measurement for 4K content. This creates the perfect balance of immersion without revealing individual pixels.
For rooms with multiple rows, we typically recommend raising rear rows by 6-12 inches. This ensures everyone has clear sightlines without having to perform neck gymnastics to see around the person in front.
Comfort is paramount – allow 24-30 inches of width per seat and at least 4 feet between rows. If you’re including powered recliners (and why wouldn’t you?), remember to account for that additional 6-12 inches behind each row when they’re fully extended.
At Top Remodeling Construction, we can help you design and implement the perfect home theater environment with lighting and seating solutions that transform ordinary rooms into extraordinary entertainment spaces.
Choosing Your Equipment & Layout
Finding the right equipment balance is where the magic happens in home theater installations. Think of this as building your entertainment foundation – you want to match your budget with your performance dreams and room realities.
Screen & Projector Decisions
The great debate in home theater installations always starts with: TV or projector? This choice shapes everything that follows.
Large TVs offer incredible convenience. They shine bright even in sunny rooms, need minimal setup, and come packed with smart features. You’ll spend between $800-$3,000 for quality 65″-85″ models, though premium options can easily exceed $10,000. As one homeowner told us, “My 77-inch OLED transformed movie night – the blacks are so deep you feel like you’re looking into space.”
Projector systems create that authentic cinema feeling with massive images (100″-150″ or more). They’re often more cost-effective for truly large screens, with entry-level systems running $1,500-$5,000. Premium projectors with reference-quality screens can reach $10,000-$60,000 for the serious enthusiast.
When planning projector-based home theater installations, several factors matter deeply. Throw distance – how far your projector sits from the screen – determines what size image you’ll get. Some short-throw models can create huge images from just a few feet away, while standard projectors might need 10-15 feet for the same size.
Ambient light is the projector’s nemesis. If your room has windows or significant lighting, look for high-brightness projectors (3,000+ lumens) paired with ambient light rejecting screens. These specialized screens (often called ALR) can make a dramatic difference in rooms that aren’t perfectly dark.
Screen gain matters too – it measures reflectivity. Higher gain screens (1.1-1.3) boost brightness but work best when viewed straight-on. Lower gain screens (0.8-1.0) maintain consistent brightness from various angles, making them better for wider seating arrangements.
Your screen options include fixed-frame (providing the most uniform surface), retractable (saving space when not watching), or in-ceiling (completely hidden until movie time). Each has its place depending on your room and lifestyle.
Speaker Layouts for Home Theater Installations
The speaker arrangement fundamentally shapes how sound envelops you in home theater installations. Most people start with the classic 5.1 system – the surround sound standard that includes front left and right speakers, a center channel (where most dialogue lives), surround speakers on each side, and a subwoofer for those room-shaking low frequencies.
Stepping up to 7.1 adds two rear surround speakers, creating more precise sound placement behind you. This works particularly well in larger rooms where sound has more space to travel and develop.
The most immersive setups incorporate height dimension with Dolby Atmos or DTS:X configurations. These might be labeled as 5.1.2 (standard 5.1 plus two ceiling speakers) or 7.1.4 (standard 7.1 plus four ceiling speakers). Dedicated enthusiasts sometimes go further with 9.2.6 configurations that truly surround you with sound.
Proper speaker placement transforms good sound into great sound. Front speakers typically sit at ear level when seated, flanking your screen. The center channel goes directly above or below the screen. Surround speakers work best slightly above ear level on side and rear walls. Height channels either mount in/on the ceiling or use clever upward-firing speakers that bounce sound off the ceiling.
As one audio engineer explained, “Speaker placement isn’t just about following diagrams – it’s about creating a bubble of sound that places you inside the action.”
All About Dolby Atmos
Dolby Atmos has revolutionized home theater installations by completely rethinking how sound works. Traditional surround sound assigns audio to specific channels – like “left surround” or “center.” Atmos instead treats sounds as “objects” that can move freely anywhere in three-dimensional space, including overhead.
This creates startlingly realistic experiences – raindrops fall from above, helicopters truly circle overhead, and ambient sounds envelop you naturally. The difference is immediately noticeable even to casual listeners.
To experience Dolby Atmos at home, you’ll need at minimum a traditional 5.1 or 7.1 system plus at least two height channels (creating a 5.1.2 or 7.1.2 setup). More immersive configurations add additional height speakers in 5.1.4, 7.1.4 or even more elaborate arrangements.
For those height channels, you have options. In-ceiling speakers provide the most convincing overhead sound but require the most installation work. Upward-firing Atmos modules that sit on top of your existing speakers offer a simpler solution. Some prefer wall-mounted height speakers positioned high on the walls as a compromise approach.
You’ll need a Dolby Atmos-compatible AV receiver with enough channels to support your speaker configuration. Content availability continues to expand, with Netflix, Disney+, and Amazon Prime offering select Atmos soundtracks. For the ultimate experience, Ultra HD Blu-ray discs often include reference-quality Atmos mixes.
As one homeowner described their Atmos upgrade: “The first time I heard rain falling from above in a movie scene, I actually looked up at my ceiling. That’s when I knew Atmos was worth every penny.”
At Top Remodeling Construction, we help you steer these choices to create a home theater that fits your space, budget, and entertainment dreams – whether you’re building a dedicated cinema room or enhancing your family room viewing experience.
Professional vs DIY: Costs, Process, and Pitfalls
When planning home theater installations, one of the first decisions is whether to tackle the project yourself or hire professionals. Both approaches have merits depending on your technical skills, budget, and desired outcome.
The cost spectrum for home theaters is incredibly wide, typically ranging from $2,000 for basic DIY setups to $33,000 or more for premium professional installations. This significant difference reflects not just the quality of components, but also the expertise, labor, and attention to detail that professionals bring to the table.
When you’re budgeting for your theater, DIY approaches might save on labor but often overlook hidden costs. These can include specialized tools, cable management solutions, and the inevitable “learning curve expenses” – those mistakes that require do-overs or replacements. On the other hand, professional installations include warranties that protect your investment, giving you peace of mind that’s hard to put a price tag on.
“I thought I’d save thousands doing it myself,” confesses one homeowner, “but after three weekends of frustration and a ceiling full of misplaced holes, hiring professionals actually saved me money in the long run.”
Benefits of Hiring Pros
Professional home theater installations bring several advantages that DIY approaches simply can’t match. When you work with experienced installers like our team at Top Remodeling Construction, you’re not just paying for labor – you’re investing in expertise and results.
The time savings alone can be substantial. What might take you several weekends of research, trial, and error can often be completed by our professionals in just 1-3 days. We’ve already climbed the learning curve so you don’t have to.
Calibration accuracy makes an enormous difference in your viewing experience. Professional technicians use specialized equipment to fine-tune audio and video settings specifically for your unique space. This process optimizes speaker levels, adjusts room correction settings, and calibrates your display for accurate colors and contrast – technical adjustments that dramatically improve performance but require specialized knowledge and tools.
Safety is another often-overlooked benefit. Professional installations ensure proper electrical load management, secure mounting of heavy equipment, and code-compliant wiring – all critical factors for both performance and peace of mind.
Perhaps most valuable is the ongoing support. When you partner with professionals, you’re building a relationship with experts who understand your system inside and out. When questions arise or you’re ready for upgrades, you’ll have trusted advisors ready to help rather than starting from scratch.
Common Mistakes During Home Theater Installations
Even enthusiastic DIYers can fall prey to some common pitfalls when setting up home theater installations. Being aware of these mistakes can help you avoid them – or recognize the value professionals bring in preventing them.
Wrong speaker height is among the most frequent errors. Many people mount surround speakers too high on the wall or position the center channel inappropriately. Ideally, most speakers should be at ear level when seated, with specific angles toward the listening position. This seemingly simple detail can dramatically impact sound quality.
Mismatched gear creates frustrating incompatibilities. Not all AV components play nicely together, and selecting the wrong combination can result in underwhelming performance or technical headaches. Professionals understand which components complement each other and can recommend cohesive systems that work harmoniously.
Neglecting power protection is a costly oversight. Many DIYers focus on the exciting components while overlooking surge protectors and power conditioning. For an investment that often totals thousands of dollars, spending $25-$200 on proper power protection is essential insurance against damage from electrical surges.
Cable management might seem purely aesthetic, but proper wiring affects both performance and troubleshooting. Professional installations include thoughtful cable routing, proper shielding to prevent interference, and clear labeling that makes future modifications simpler.
Room acoustics frequently get overlooked in the excitement of selecting equipment. The finest speakers in the world will underperform in a room with poor acoustics. Professionals evaluate how sound moves through your space and can recommend treatments that minimize echo, reduce reverberation, and eliminate standing waves that muddy the sound.
“The difference between an amateur and professional installation isn’t just about how it looks,” explains one industry veteran. “It’s about how it performs five years later when technologies have changed and you need to make adjustments.”
At Top Remodeling Construction, we’ve seen the challenges homeowners face when attempting complex installations. Our experience allows us to anticipate and prevent these common pitfalls, ensuring your home theater delivers the exceptional experience you’re investing in.
Smart Home Integration & Futureproofing
Modern home theater installations are no longer standalone entertainment systems. Today, they’re becoming the heart of connected homes, offering experiences that feel almost magical when everything works together seamlessly.

Connecting Everything Seamlessly
Remember the days of juggling six different remotes, trying to figure out which one controls the volume? Those frustrating experiences are becoming a thing of the past. Today’s home theater installations can connect with your entire home ecosystem for truly effortless entertainment.
Unified control systems have revolutionized how we interact with our theaters. Instead of that dreaded remote basket, a single universal remote or smart tablet can control everything from your movie selection to room lighting. Some of our clients actually laugh when they realize how simple it’s become – one tap labeled “Movie Night” can dim the lights, lower the shades, power up the projector, and start the popcorn maker (okay, we’re still working on that last one).
Voice control has added another layer of convenience that feels straight out of science fiction. “Alexa, it’s movie time” can trigger a whole sequence of events to create the perfect viewing environment. As one client told us recently, “I never thought I’d be having conversations with my theater room, but now I can’t imagine life without it!”
Creating this seamless experience requires thoughtful planning of your networking infrastructure. While wireless technology has improved dramatically, nothing beats a hardwired Ethernet connection for your main components. For streaming devices and smart TVs, a stable connection is essential to avoid the dreaded buffering wheel in the middle of a climactic scene.
Many homeowners are surprised to learn about HDMI-CEC and eARC technologies. These features allow your devices to communicate with each other through your HDMI cables. When properly set up, pressing play on your streaming device can automatically power on your TV and sound system, switch to the correct inputs, and begin playback – all without touching another remote.
“Home theater systems can be integrated into existing smart home automation controls to manage lighting and climate alongside playback,” explains an industry professional. This integration creates a truly immersive experience where technology fades into the background, letting the entertainment take center stage.
Maintaining & Upgrading Over Time
The only constant in home theater technology is change. New formats, higher resolutions, and improved audio standards emerge regularly. At Top Remodeling Construction, we believe in designing home theater installations that can evolve alongside technology.
Modular design is our first principle for future-proofing. Rather than installing all-in-one systems that require complete replacement when one component becomes outdated, we recommend selecting individual components that can be upgraded separately. This approach protects your investment and allows for gradual upgrades as your budget permits.
When we run cables through walls, we often install conduit – essentially a smooth tube that allows for future cable upgrades without opening up your beautiful walls again. One homeowner called this their “favorite invisible feature” after easily upgrading to HDMI 2.1 cables years after their initial installation.
The importance of firmware updates can’t be overstated. We recommend equipment from manufacturers with a solid track record of supporting their products long-term. These updates can add new features, improve compatibility, and fix bugs – sometimes making your system feel brand new without spending a dime.
Planning for expandable audio systems makes future upgrades much simpler. We often suggest receivers with more channels than currently needed, allowing you to add height speakers for Dolby Atmos or additional zone capabilities later without replacing your core equipment.
Many of our clients benefit from ongoing service plans that include regular system checks, cleaning, and recalibration. Like a car needs maintenance to run its best, home theaters benefit from professional attention to maintain peak performance.
At Top Remodeling Construction, we design home theater installations with longevity in mind, helping you make equipment choices that balance current performance with future flexibility. We can integrate your theater with existing smart home systems or help you begin building a connected home experience that will delight your family for years to come.
Frequently Asked Questions about Home Theater Installations
What are typical installation costs?
Creating your dream cinema experience comes with varying price tags, largely dependent on your vision and needs. Home theater installations span a wide range of budgets, with each tier offering different experiences.
A basic setup typically runs between $2,000-$5,000, giving you a solid foundation with a 60-inch TV, wall mount, five speakers, a subwoofer, amplifier, and essential wiring. This package delivers enjoyable performance in your existing living space without requiring major modifications to your room.
Stepping up to a mid-range theater ($5,000-$15,000) opens doors to higher quality components – perhaps swapping that TV for a projector and screen – along with in-wall speakers for a cleaner look, basic acoustic treatments to improve sound quality, and more sophisticated control systems that simplify operation.
For those seeking the ultimate experience, high-end custom theaters ($15,000-$33,000+) incorporate premium equipment, comprehensive acoustic treatments, custom-designed seating, sophisticated lighting control, and potentially structural modifications to optimize your space.
When it comes to labor costs, simple installations like soundbar setup typically start around $99.99, while TV mounting and setup runs about $249.99. More complex projects involving in-wall wiring and custom work are priced based on your specific space and requirements.
Here at Top Remodeling Construction, we pride ourselves on providing clear, detailed quotes that help you understand exactly where your investment is going. We’re happy to work with various budgets, focusing on maximizing value while delivering a theater experience that will delight you for years to come.
How long does the installation process take?
The timeline for home theater installations varies considerably depending on what you’re envisioning for your space.
A basic living room setup typically takes just 1-2 days for equipment installation and initial calibration – perfect for those eager to start enjoying their new system quickly.
A dedicated theater room usually requires 3-7 days for complete installation, including the more time-intensive process of running wiring through walls and ensuring everything is properly integrated.
If you’re dreaming of a custom theater requiring construction, the timeline extends to 2-6 weeks when structural changes, custom cabinetry, or significant acoustic treatments are part of the plan.
Your theater journey typically follows a natural progression: we start with planning and design (1-2 weeks), move to pre-wiring if needed (1-2 days), complete any necessary construction or room preparation, install the equipment (1-3 days), perform professional calibration and programming (1-2 days), and finish with a personalized training session (1-2 hours) to ensure you’re comfortable with your new system.
Our team at Top Remodeling Construction works efficiently to minimize disruption to your home life while ensuring every detail receives the attention it deserves. During your initial consultation, we’ll provide a specific timeline custom to your project’s unique requirements.
Can I start small and expand later?
Absolutely! Many of our clients build their dream theaters in stages, and home theater installations are perfectly suited for this approach. Think of it as creating a solid foundation that can grow with your needs and budget.
The secret to successful expansion starts with investing in quality fundamentals. Choose a capable AV receiver with enough channels to support your future vision, even if you’re not using all those connections initially. A good display that will serve you well for years is also worth the upfront investment.
Many of our clients begin with a 3.1 or 5.1 system – focusing on a solid front soundstage with left, center, and right speakers plus a subwoofer. This configuration delivers remarkably satisfying performance, and surround speakers can easily be added later to complete the experience.
If you’re intrigued by the immersive experience of Dolby Atmos, start with a traditional surround setup and add those height channels when you’re ready. The foundation you build today can support those improvements tomorrow.
Rather than replacing everything at once, consider the strategy of upgrading one component at a time. This approach lets you address the weakest link in your system when your budget allows, continuously improving your experience.
The key is planning for expansion from the beginning. Ensuring your initial wiring and equipment placement accommodates future additions saves significant hassle down the road.
As one industry professional wisely notes, “One size does not fit all in personal cinema.” Your home theater should be as unique as you are, evolving alongside your preferences and possibilities.
At Top Remodeling Construction, we specialize in designing systems that meet your current needs while laying the groundwork for future improvements. Our modular approach ensures you get the best possible performance at each stage of your theater’s evolution, creating an entertainment space that grows with you.
Conclusion
Creating the perfect home theater installation is a journey that blends technology with personal touches to transform ordinary spaces into extraordinary entertainment havens. Whether you’re converting a spare bedroom, finishing your basement, or reimagining your living room, the right approach can bring true cinema magic right into your home.
At Top Remodeling Construction, we see each home theater project as a unique opportunity to create something special. As a family-owned business, we bring genuine care and attention to detail that larger companies simply can’t match. We don’t just install equipment—we create experiences that will delight you and your family for years to come.
The change from an everyday room to an immersive theater environment involves numerous decisions, from equipment selection to acoustic treatments. But trust us when we say the end result makes every decision worthwhile. There’s nothing quite like experiencing your favorite movies with crystal-clear visuals and sound that wraps around you from every direction.
Home theater installations aren’t just about the technology—they’re about creating spaces where memories are made. They become the gathering spot where friends crowd together for the big game, where kids pile in for movie night, and where you can escape into stories that move you after a long day.
“We would give a 10 out of 10 for ratings,” one of our satisfied clients recently told us. “The mix of technology, right tools, guidance, and on-site training is the best way to reach perfection and deliver the best AV service.”

We pride ourselves on our ability to work within diverse budgets while still delivering exceptional results. Whether you’re starting with a modest setup that you plan to expand over time or diving straight into a comprehensive custom theater, our team in Las Vegas is ready to guide you through every step of the process.
The satisfaction we feel when clients first experience their completed theater—the widened eyes, the surprised laughter, the immediate reaching for the remote to try everything out—that’s what drives our passion for this work. We love creating spaces that bring joy and wonder into your daily life.
Ready to begin your home theater installation journey? Whether you’re just curious about possibilities or ready to start planning, contact our home remodeling experts to plan your dream home theater today! Let’s create something amazing together.