Why Kitchen Cabinet Makeovers Are the Smart Money Move
Kitchen cabinet makeovers can transform your space without the massive expense of full replacement. Here are your main options:
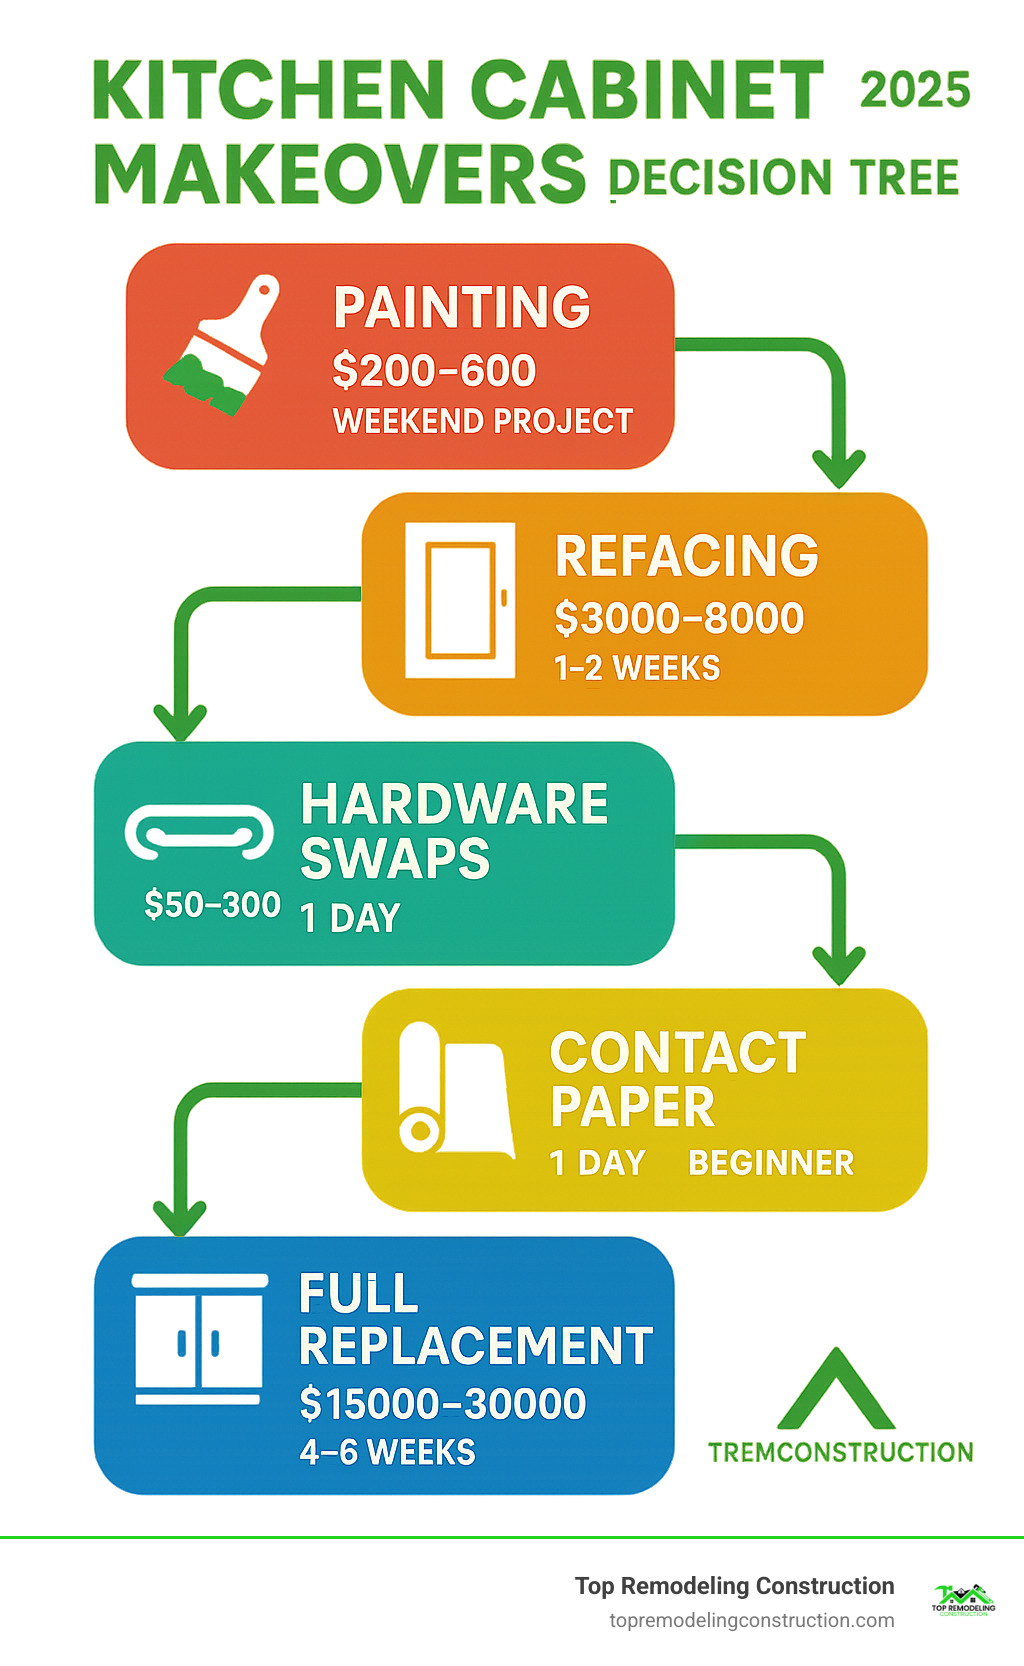
- Paint cabinets: $200-$600 DIY, most cost-effective option
- Reface cabinets: 30-50% less than replacement, keeps structure
- Replace hardware: $2+ per piece, instant style upgrade
- Add contact paper: Under $20 for renters, removable
- Install under-cabinet lighting: $20-$40, 10-minute installation
Your kitchen is the heart of your home, but outdated cabinets can make the whole space feel tired. The good news? You don’t need to gut everything to get the look you want.
Most homeowners see a 30% return on investment after a major kitchen renovation, and cabinet updates are often the biggest visual impact for the least money. Whether you’re dealing with honey oak from the 90s or builder-grade basics, the right makeover approach can give you that custom look without the custom price tag.
Refacing costs 30-50% less than replacement, while a simple paint job can cost as little as $200 if you DIY. Even small changes like swapping hardware can make cabinets look completely different.
The key is picking the right technique for your budget, timeline, and skill level. Some projects take a weekend, others need professional help – but all beat the cost and hassle of starting from scratch.
Key terms for kitchen cabinet makeovers:
Plan, Prep & Sustainability First
Here’s the truth about kitchen cabinet makeovers: the difference between a stunning change and a regrettable mess isn’t talent or expensive tools – it’s preparation. We’ve seen countless homeowners get excited about the fun part (picking colors!) and rush through the boring stuff. Don’t be that person.
Start with a deep clean that actually works. Your cabinets have been collecting cooking grease, food splatters, and mystery sticky spots for years. Regular cleaners won’t cut it here. You need a serious degreasing agent like TSP (trisodium phosphate), or even a strong mix of dish soap and warm water. Pay extra attention to the areas around your stove and sink where grease loves to hide.
Sanding isn’t about perfection – it’s about adhesion. You don’t need to strip everything down to bare wood, but that light scuff with 220-grit sandpaper gives your new finish something to grab onto. If your cabinets have a glossy finish, this step goes from helpful to absolutely critical.
Bonding primer is your best friend. This is where many DIYers try to save a few bucks and regret it later. A high-quality bonding primer designed specifically for kitchen cabinets handles moisture, temperature changes, and daily wear. It’s basically insurance against chipping and peeling six months down the road.
Choose eco-friendly options when possible. Low-VOC paints and eco-friendly veneers aren’t just better for the planet – they’re better for your family’s health too. Look for products with Green Seal certification or similar ratings.
Safety gear protects your future self. Dust masks, safety glasses, and good ventilation aren’t suggestions – they’re requirements. If you’re working with cabinets from before 1978, test for lead paint first.
Budget planning prevents that sinking feeling. Write down everything you need before you hit the store: paint, primer, brushes, rollers, sandpaper, drop cloths, painter’s tape, and new hardware. Add 20% to your estimate for those inevitable “oops, I need this too” moments.
The mistakes that make us cringe: skipping the degreasing step because paint won’t stick to greasy surfaces, using regular wall paint instead of cabinet-grade paint, not removing doors and hardware before starting, and forgetting to label doors and their hinges.
Some projects are perfect for DIY, but others benefit from professional expertise. If the prep work feels overwhelming or you’re not confident in your skills, more info about kitchen remodel services can help you decide what makes sense for your situation.
Kitchen Cabinet Makeovers: Budget-Friendly Techniques
Ready to dive into the fun stuff? Let’s explore the most popular kitchen cabinet makeover techniques and what they’ll actually cost you – not just in dollars, but in time and weekend plans too.
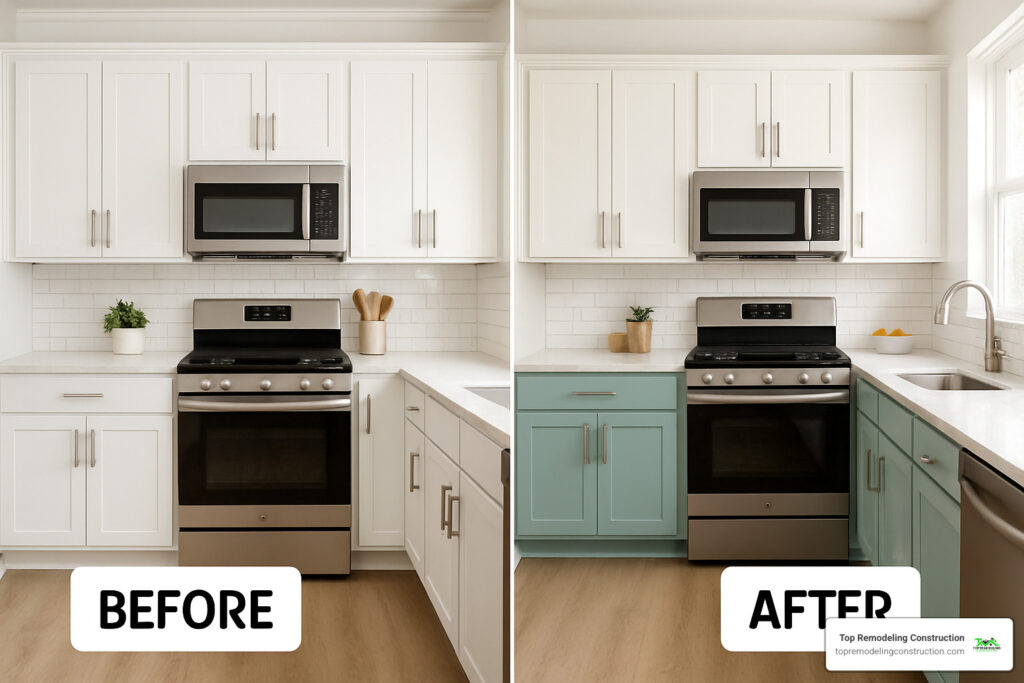
Painting is still the undisputed champion when it comes to budget-friendly changes. For just $200-$600 in materials, you can completely reinvent your kitchen’s personality. The secret sauce? Using cabinet-specific paint in semi-gloss or satin finish. High-gloss looks stunning in magazines, but it also shows every fingerprint and imperfection.
Cabinet refacing offers that custom kitchen vibe without the months-long disruption. You keep your existing cabinet boxes (the part that’s probably fine anyway) and swap out the doors, drawer fronts, and hardware for a fresh look. This approach typically saves you 30-50% compared to full replacement and wraps up in days instead of weeks.
Hardware swaps deliver the biggest bang for your buck. We’re talking about upgrades that start at just $2 per piece but can make people think you got entirely new cabinets. Cup pulls bring farmhouse charm, sleek bar pulls scream modern sophistication, and brass hardware adds that warm, timeless appeal.
Peel-and-stick vinyl has seriously upped its game in recent years. This isn’t your grandmother’s contact paper anymore. Today’s vinyl films can convincingly mimic wood grain, stone textures, and even complex patterns. It’s perfect for renters or anyone who likes to change their mind frequently.
DIY Shaker trim transforms boring flat doors into classic beauties. You’re essentially gluing and nailing simple wood strips to create that coveted Shaker panel look. It requires more patience than painting but costs way less than replacement.
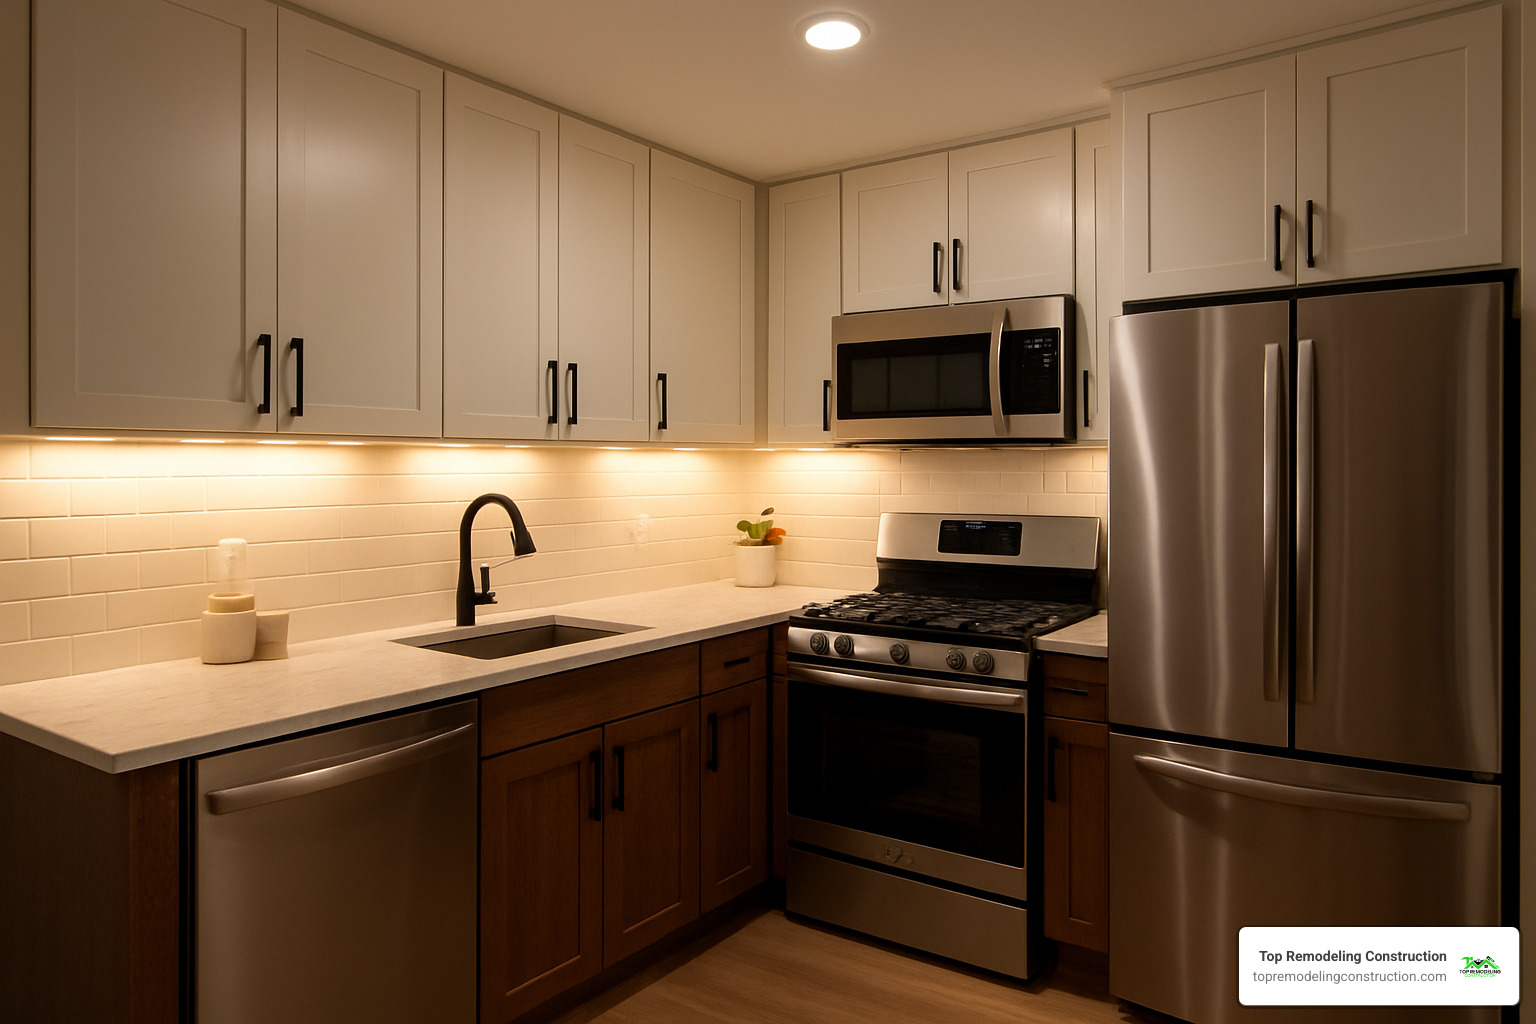
Two-tone color schemes have become incredibly popular for good reason – they break up large expanses of cabinets and can actually make your kitchen feel bigger. Think white upper cabinets paired with navy, sage green, or charcoal gray lowers.
Here’s the reality check on costs and commitment:
| Method | DIY Cost | Time | Durability | Skill Level |
|---|---|---|---|---|
| Paint | $200-600 | 2-4 days | 5-10 years | Beginner |
| Reface | $3,000-8,000 | 3-5 days | 15-20 years | Intermediate |
| Replace | $15,000-30,000 | 2-6 weeks | 20+ years | Professional |
| Hardware Only | $50-300 | 1 day | 10+ years | Beginner |
| Contact Paper | $20-50 | 1 day | 2-5 years | Beginner |
Kitchen Cabinet Makeovers: Paint vs Reface vs Replace
Labor hours tell the real story behind these projects. Painting eats up 20-40 hours depending on your kitchen size. Refacing clocks in at 15-25 hours but demands more precision and measuring skills. Full replacement? You’re looking at 40-80 hours plus potential surprises like electrical or plumbing adjustments.
Durability varies more than you might expect. A quality paint job should serve you well for 5-10 years with reasonable care. Refacing can go the distance for 15-20 years since you’re getting genuinely new door materials. Full replacement obviously wins the longevity contest, but you’re paying premium prices for that peace of mind.
Material costs can sneak up on you. Paint looks cheap on paper until you add primer, quality brushes, rollers, sandpaper, and all those little prep supplies that add up fast. Refacing materials cost more per square foot, but you need fewer specialized tools.
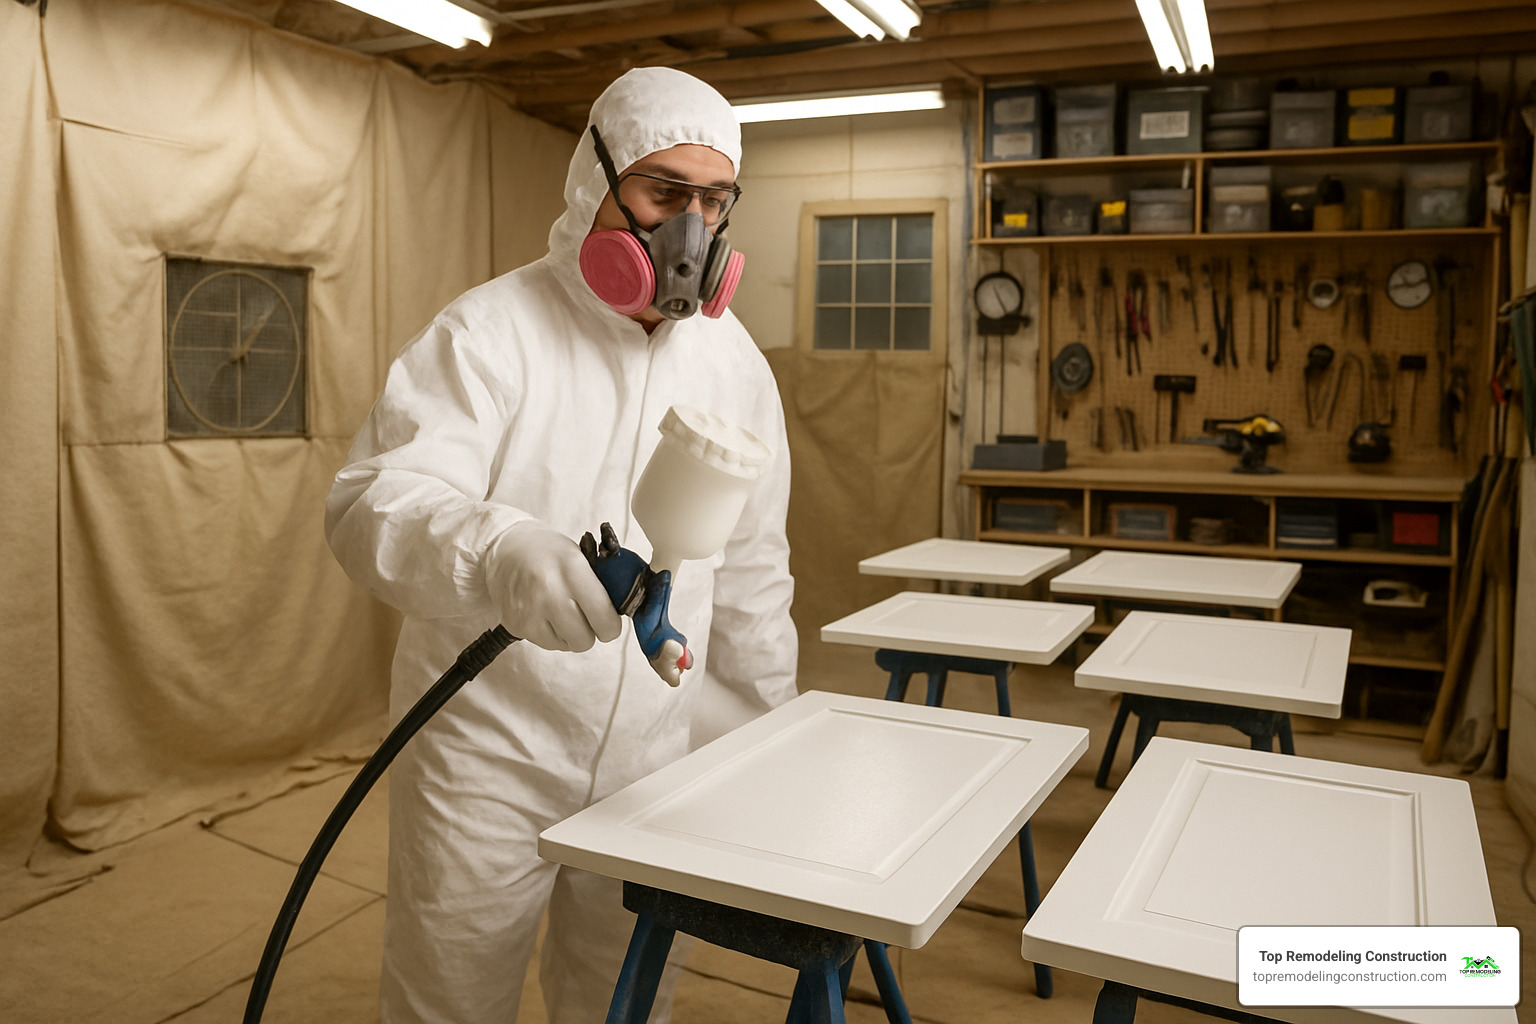
Step-by-Step Cabinet Painting Success
The clean-sand-prime-paint-cure process is absolutely non-negotiable. Think of it like building a house – each step creates the foundation for the next, and skipping any of them shows up in your final results.
Your essential tools list includes degreasing cleaner (TSP works great), 220-grit sandpaper and sanding block, tack cloth for dust removal, high-quality bonding primer, cabinet-grade paint in semi-gloss or satin, a 2-inch angled brush for detail work, 4-inch foam roller for flat surfaces, paint tray and liners, painter’s tape, drop cloths, and a screwdriver for hardware removal.
Drying times matter way more than you think. Primer needs a solid 4-6 hours minimum, paint coats require 6-8 hours between applications, and here’s the kicker – the final cure takes 30 days. Yes, you read that right. You can gently use the cabinets after 24 hours, but treat them like newborns for the first month.
Pro tip that makes all the difference: Remove doors completely and paint them flat in a clean, dust-free area. Paint behaves better on horizontal surfaces, and you’ll avoid those annoying brush marks and drips.
Kitchen Cabinet Makeovers for Renters
Renting doesn’t mean you’re stuck with whatever cabinet situation your landlord thought was “good enough.” You just need to be smarter about your approach to protect that security deposit.
Contact paper has seriously evolved from the sticky nightmare you remember. Modern versions look surprisingly realistic and remove cleanly when moving day arrives. Work slowly to avoid bubbles, and use a smoothing tool for professional results.
Removable wallpaper opens up exciting possibilities for flat cabinet doors. Peel-and-stick wallpaper designed for temporary use can completely transform your kitchen’s personality. Always test a small, hidden area first to ensure clean removal.
Getting landlord permission for painting might be easier than you think. Some landlords actually appreciate tenants who improve the property, especially if you agree to return cabinets to their original color when you move. Get any agreements in writing.
Plug-in lighting upgrades can dramatically improve your kitchen’s ambiance without any electrical work that might violate your lease. Battery-operated LED strips or plug-in pendant lights now come with remote controls and dimming features that rival hardwired options.
Style, Storage & Lighting Upgrades
Once you’ve tackled the basic makeover, these upgrades take your kitchen cabinet makeover from good to great. Think of them as the jewelry that completes the outfit.
Glass inserts instantly lift basic cabinets. Clear glass shows off your dishes, frosted glass hides clutter while still feeling open, and seeded or reeded glass adds vintage character. You can retrofit most frame-style doors with glass – just route out the center panel and install glass with glazing points.
Cane webbing brings texture and warmth. This traditional material works especially well in farmhouse or transitional kitchens. Pre-woven cane sheets make installation easier – just cut to fit and secure with thin strips of wood molding.
Statement hardware makes the biggest impact for the least money. We’re talking about pulls and knobs that actually complement your new cabinet finish. Brass brings warmth, matte black feels contemporary, and brushed nickel stays neutral.
Pull-out shelves solve the “black hole” problem. No more crawling into cabinets to reach items in the back. These can be retrofitted into most existing cabinets and make every inch of storage accessible.
Lazy Susans maximize corner cabinet space. Corner cabinets are notorious dead zones, but a quality lazy Susan makes them functional. Look for full-extension models that bring items to the front of the cabinet.
LED strips transform both function and ambiance. Under-cabinet lighting eliminates shadows on countertops and creates a warm glow that makes kitchens feel more welcoming. Modern LED strips are thin, energy-efficient, and available in various color temperatures.
Houseplants add life and actually improve air quality. Scientific research on indoor plants shows they can help purify air and improve focus. Herbs on open shelves serve double duty as décor and cooking ingredients.
For comprehensive cabinet solutions, consider More info about design your dream custom cabinets – sometimes starting fresh gives you exactly what you need.
Hardware That Makes a Statement
Brass pulls are having a major moment. They add warmth and work with both traditional and modern styles. The key is choosing the right finish – polished brass is formal, brushed brass is casual, and aged brass feels vintage.
Matte black knobs and pulls feel contemporary and sophisticated. They’re especially striking against white or light-colored cabinets. The downside? They show fingerprints and water spots more than other finishes.
Cup pulls give instant farmhouse charm. These half-circle pulls were originally designed for drawers but work on doors too. They’re comfortable to use and add a vintage touch without being too themed.
$2 upgrades that look like a million bucks. Basic cabinet pulls at home centers start around $2 each. Multiply by 20-30 pieces and you’re looking at $40-60 for a complete hardware refresh.
Boosting Storage the Smart Way
Vertical dividers organize baking sheets and cutting boards. These simple additions keep flat items organized and accessible instead of stacked in an unstable pile.
Pull-out trays bring everything within reach. Install them in base cabinets to eliminate the need to crouch and dig. They’re especially valuable in deeper cabinets where items get lost in the back.
Door-mounted storage maximizes every inch. Spice racks, cutting board holders, and cleaning supply organizers can be mounted on the inside of cabinet doors. Just make sure they don’t interfere with shelf contents.
Lighting Layers for Wow + Function
LED bars provide even, shadow-free task lighting. Mount them under upper cabinets to illuminate countertops. Look for models with integrated dimming and color temperature adjustment – warm white for ambiance, cool white for detailed work.
Puck lights offer focused illumination. These small, round fixtures work well for accent lighting inside glass-front cabinets or highlighting specific work areas. Battery-powered versions install in minutes.
10-minute installations are actually possible. Battery-operated LED strips with adhesive backing can be installed in the time it takes to make coffee. No electrician required, no permits needed.

Frequently Asked Questions about Kitchen Cabinet Makeovers
Let’s tackle the questions we hear most often about kitchen cabinet makeovers. These are the real concerns homeowners have when they’re standing in their kitchen, wondering if they can actually pull this off.
Timeline worries keep people up at night. Here’s the truth: painting typically takes 3-5 days including all that boring prep work and drying time. Don’t let anyone tell you it’s a weekend project unless you’re only doing a few doors. Refacing runs about the same – 3-5 days depending on how many cabinets you’re dealing with.
Hardware swaps are the speed demons of makeovers. You can knock out an entire kitchen in an afternoon if you’re just switching pulls and knobs. Contact paper application falls somewhere in the middle at 1-2 days for a full kitchen.
Paint choice makes or breaks your project. Semi-gloss or satin latex paint specifically formulated for cabinets will serve you best. The key words here are “specifically formulated” – your leftover bedroom paint won’t cut it. Look for brands that actually mention durability and scrubbability on the label.
Cleaning painted cabinets doesn’t require a chemistry degree. Mild dish soap and warm water with a soft cloth handles most situations. Skip the abrasive cleaners and scrubbing pads – they’ll dull your beautiful new finish. For stubborn spots, make a paste with baking soda and water.
The dreaded chipping and peeling question comes up constantly. Proper preparation prevents 95% of durability issues. This means actually cleaning thoroughly, sanding lightly, using bonding primer, and applying thin coats of quality paint.
The hardest part for most people? Waiting for full cure time. Your cabinets need 30 days to reach maximum durability. You can use them gently after 24 hours, but baby them for that first month.
How much does a DIY cabinet painting project cost?
Materials for an average kitchen run $200-600, and that’s not just paint. You’re looking at primer, paint, brushes, rollers, sandpaper, painter’s tape, drop cloths, and all those little supplies that add up quickly. Higher-end paints cost more upfront but often provide better coverage, which means fewer coats and less work.
Professional painting jumps to $1,500-4,000 depending on your kitchen size and how detailed your cabinets are. All those little nooks and crannies in raised-panel doors take time, and time costs money.
Hidden costs have a sneaky way of appearing. That second trip to the hardware store for the supplies you forgot. The takeout meals because your kitchen is torn apart. Maybe some new tools if you don’t already own quality brushes and rollers.
Here’s how the numbers stack up: DIY painting costs $200-600, professional painting runs $1,500-4,000, refacing jumps to $4,000-10,000, and full replacement starts at $15,000 and climbs from there.
Will refacing add value to my home?
Kitchen updates typically return about 30% of investment when you sell. Refacing falls squarely into this category because it dramatically improves appearance while keeping all the functionality intact. Your cabinets look completely different, but the bones are the same.
Buyer perception often matters more than actual cost. Updated kitchens photograph beautifully for listings and make powerful first impressions during showings. Most buyers can’t tell the difference between refaced cabinets and brand-new ones – they just see a fresh, modern kitchen.
Timing your sale makes a difference too. If you’re planning to sell within 2-3 years, refacing makes solid financial sense. If you’re staying put for the long haul, choose the option you’ll actually enjoy living with every day.
What mistakes should I avoid to keep my kitchen cabinet makeover stress-free?
Rushing the timeline causes more heartache than any other mistake. We get it – you want your beautiful new kitchen now. But wet paint that gets touched too soon, insufficient drying between coats, and skipped prep work all come back to haunt you later.
Underestimating the mess and disruption catches everyone off guard. Your entire kitchen routine gets turned upside down. Plan for alternative meal prep and eating arrangements. Protect your floors, countertops, and appliances from dust and paint splatters.
Material choices can make or break your project. Regular wall paint won’t survive kitchen life. Cheap brushes leave visible marks in your finish. Wrong primer leads to paint that peels off in sheets six months later. This isn’t the place to pinch pennies.
Color and finish testing saves major regrets. Paint looks completely different under your kitchen lighting compared to the paint store. Test actual samples on your cabinet doors and live with them for a few days before buying gallons of paint.
Know your limits and respect them. There’s absolutely no shame in calling professionals for complex work. Poor DIY results cost way more to fix than doing it right the first time. Sometimes the smartest move is admitting when a project is beyond your comfort zone.
Conclusion
Your kitchen cabinet makeover journey doesn’t have to end with a maxed-out credit card and months of construction chaos. The smart money is on changing what you have – and the results speak for themselves.
Think about it: most projects can wrap up in a single weekend if you plan well and set realistic goals. A fresh coat of paint, some new hardware, and maybe under-cabinet lighting can make your kitchen feel like a completely different space. You’ll walk in Monday morning wondering if you accidentally wandered into someone else’s house.
The math makes sense too. While full cabinet replacement can hit $30,000 or more, a thoughtful makeover delivers similar visual impact for a fraction of the cost. Your 30% return on investment at resale is just the bonus – you get to enjoy the change every single day you live there.
Taking care of your new finish isn’t rocket science. Gentle cleaning with mild soap, avoiding harsh scrubbers, and touching up the occasional nick will keep things looking fresh for years. It’s like maintaining a car – a little attention goes a long way.
One weekend really can change everything when you focus on the changes that pack the biggest punch. New paint and hardware alone can make 20-year-old cabinets look current again. Add some task lighting and you’ve got a kitchen that feels custom without the custom price tag.
Here’s the thing though – not everyone has the time to sand, prime, and paint their way through a weekend. Maybe you’re dealing with lead paint, or your cabinets need more help than YouTube tutorials can provide. That’s where Top Remodeling Construction comes in.
Our family-owned business understands that your kitchen needs to work for your life. We’ve been helping Las Vegas homeowners steer kitchen changes for years, and we know the difference between a quick fix and a lasting solution. When you work with us, you get the benefit of professional expertise without losing the personal touch that makes a house feel like home.
The worst cabinet makeover is the one you keep putting off. Whether you grab a paintbrush this weekend or call in the pros, the important thing is getting started. Your morning coffee tastes better in a kitchen you actually love.
Ready to stop dreaming and start doing? Get a Free Quote and let’s figure out the best way to give you the kitchen you’ve been wanting – without the stress you’ve been dreading.